Friday 30 March 2012

Miguel Maestre Masterclass- Seafood Paella


Last night I was fortunate enough to attend a masterclass with the incredibly talented and ultra charismatic Miguel Maestro. Said in my best Troy McClure voice, 'You may remember him from such shows as Masterchef and Boy's weekend'. I could listen to him (Miguel, not Troy) speak with that amazing accent for hours and hours. You should watch out for his new tv show, The Living Room with Amanda Keller, Dr Chris Brown and Barry Du Bois. If Miguel's in it, I know it will be good.

Miguel demonstrated his signature Seafood Paella, which looked amazing and tasted even better. I confess- I do not eat seafood, but I was very brave and actually ate around the seafood- probably the first time since I've eaten anything touching seafood since I stopped eating it 16 years ago. It was absolutely delicious and, I'm very glad to say, the rice didn't taste at all fishy. Needless to say, my mother and sister were very proud of me for trying.

Thanks Rach, Neish, Amanda and Katja for a lovely night. Thanks Miguel for the fantastic demonstration. I'm looking forward to using my new Spanish cooking book. First stop this weekend is the shops to buy a Paella pan and Bomba rice.


Paella a la Maestre- recipe by Miguel Maestre

note: as Miguel told us, you can add whatever meat or seafood you like and feel free to change the vegetables and herbs as you please. The one he made last night was, in fact, quite different from the below recipe.

Serves: 4
Prep timr: 20 minutes
Cooking time: 30 minutes
Equiptment needed: Paella pan and Paella burner, Food processor, medium sized pot, mixing bowls, spoons, ladles, chopping board, tea towels and serving plate

Ingredients

1 tbspn olive oil
400g Calsparra/Bomba rice
500g Mussels (cleaned)
2 King prawns
1 blue swimmer crab, cleaned and quartered
4 Baby calamari hoods, cleaned
4 yabbies
2L fish or chicken stock
salt and pepper
200g peas (fresh or frozen)
2 lemons, halved
2limes, halved
chopped parsley

For the Sofrito

150 ml Olive oil
15ml Sherry vinegar
3 large ripe oxheart tomatoes
1/2 chorizo sausage
3 pink shallors, peeled
4 cloves garlic, peeled
4 piquillo peppers
1/2 bunch thyme
1/2 bunch mint
1/2 bunch parsley
1/2 bunch coriander
1 bunch chives
1 tsp saffron
1 tsp sweet paprika
1 tsp spicy paprika
1 tsp smoked paprika

Method

For the sofrito, place all ingredients in a food processor. Process till smooth.
Heat oil in a large Paella pan. Add rice. Cook, stirring occasionally, for about 5 minutes or until it chages colour from white to transparent.

Stir in 12 tablespoons of sofrito mix. Cook for 3 minutes. Add seafood and stock. Seson. Cook over medium heat, without stirring, for about 25 minutes or unitl stock has been absorbed and rice is almost tender. Reduce heat to low and cook for a further 3 minutes to form a nice 'soccarrada'or crust on the bottom of the pan. Add peas and remove from heat. Stand, covered with a tea towel for 5 minutes. Squeeze over lemons and limes and season. Garnish with parsley. Serve paella warm, not steaming hot.

Wednesday 28 March 2012

'Tis the season to indulge in Hot Cross Buns


Normally I loathe the greed of retailers, bringing out Easter eggs before the shelves are cleared of Christmas decorations and candy canes. There is, however, one very important exception to this rule: I absolutely relish the fact that supermarkets and bakers seem to be offering Hot Cross Buns earlier and earlier with every passing year. Oh how I love them! Whether fresh or toasted with lashings of butter, I would happily eat Hot Cross Buns all year long.


They are in fact relatively easy to make and warm from the oven, they are the pinnacle of Hot Cross Bun goodness. If you have the time to spend a lazy afternoon pottering about the kitchen. I do encourage you to make some. I heed you a warning, however: unlike the store bought variety, these have no preservatives, so whatever you can't use within 1-2 days, I'd suggest you freeze the remainder.

Recipe

Dry Ingredients

15g Instant Yeast
400g Bread Flour (I use Wallaby's Bakers flour or Lighthouse Bread flour)
100g Cake/Pastry Flour (I use Lighthouse brand)
1 Tbsp Cinnamon
1 tsp ground ginger
1 tsp nutmeg
1/4 tsp ground clove
50g Brown sugar
50g Caster sugar
1 tsp salt
225g mixed dried fruit (whatever you fancy)

Wet ingredients:

100g unsalted butter, melted
25g milk
200g water
1 egg

Egg wash:
1 egg
1 Tbsp milk


Method:

Combine dry ingredients (everything except the fruit) in a large bowl. Make a well in the centre. Combine wet ingredients in a smaller bowl and then pour the wet into the well in the centre of the dry ingerdients. Using a wooden spoon, gently incorporate the dry into the wet until it comes together into a sticky dough.

Lightly dust the bench top and empty contents of the large bowl onto the bench. Knead, incorporating additional flour as necessary to keep your hands from sticking, for a few minutes until the gooey mess comes together into a smooth dough. At this point, lightly oil a large bowl, put the dough inside the bowl, cover with plastic and leave to rise for 1 1/2 to 2 hours, or until doubled in volume.

Punch the dough down and add your choice of dried fruit to the bowl. Give a little knead to combine, then separate the dough into plum sized rounds. Place the rounds on a greased baking tray, just touching.

Whisk together the egg and milk for the egg wash and brush the tops of the buns with the mix. Leave the buns for their final proof for about a 1/2 hour.

Preheat oven to 190 degrees Celsius while you get on with the cross paste.

Cross Paste

Ingredients:

125-150g water
125 g flour
50g unsalted butter, melted
30g milk powder (If you don't have this, reduce quantity of water and substitute with some milk)
pinch of Baking powder
pinch of salt

Method:

Whisk wet ingredients into dry ingredients until a thick, glue like consistency is reached. Add liquid little by little. If it is still too thick, continue to add more water until it is right.

Place mix into a piping bag or, failing that, sealed in a zip lock bag with a corner snipped off. Pipe crosses onto the fully proofed buns, which by now would have doubled in size. Place in the preheated oven for 20-25 minutes. Watch them carefully- oven temperatures vary enormously. They should be golden brown and should have a hollow sound when you knock on the underside of the buns. Enjoy them warm or toasted with butter. Mmmmm...... Butter.

Saturday 24 March 2012

Popcorn Macarons


Every Wednesday at 3pm is afternoon tea time at my work. I was put onto the afternoon tea roster when I began working there, around the beginning of February, and have been waiting impatiently ever since for my turn to bring in afternoon tea. This Wednesday was my very first week and I decided to make Adriano Zumbo's wonderfully weird Popcorn Macarons.

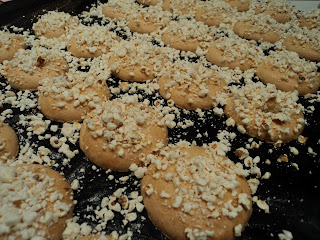
I'm not going to lie to you- I was disappointed when after all the effort I went to to ensure that a proper skin was formed on the macarons before they went in the oven, they decided to crack on the surface anyway. Aargh! So frustrating! I seriously could have thrown them into the bin on the spot, I was that irritated. But, before being too hasty, I realised that the cracked appearance on the surface wouldn't be at all apparent with this particular type of macaron. Why, you may ask? Because the cooked macarons are painted with melted butter and scattered with finely processed popcorn pieces. Crisis averted- phew!


In spite of my panic on Tuesday night, the Popcorn Macarons were a hit at work and wolfed down greedily by all and sundry. They were, I must admit, quite delicious- the saltiness of the buttercream and popcorn balancing out the sweetness of the macarons and making them altogether more moreish. That being said, I do hope for a better outcome for my macarons shells next time around.


Sunday 18 March 2012

Flour tortillas

Being stuck in the house with the flu has its compensations. For one thing, you can waste hours away in front of the television and computer without feeling remotely guilty. More importantly, it is an ideal opportunity to potter about the kitchen.

It is always somewhat exciting for me to do a pantry and fridge raid, creating something delicious out of the few ingredients I have remaining. Today I decided to make some fresh tortillas.

I must confess, the tortillas in question are not in fact tortillas, but paratha bread. For arguments sake, let's just call it flat bread. It is essentially the same thing, only Tortillas are usually made by rubbing lard into the flour, whilst I used a much easier and healthier alternative: olive oil. Also, I used Atta flour, which is a type of wholemeal wheat. You could, of course, use regular white flour; I just like the taste and texture of the Atta flour. Plus, it is now available in Coles and woolworths.

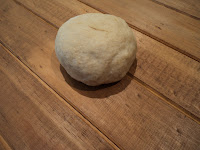
Essentially, to make 3 large flatbread, as I did, or 6 small, add 120mls warm water,1 1/3 tablespoons Olive Oil (or other oil if you prefer) and a pinch of salt to 1 cup of Atta flour. Stir to combine, give a quick knead till it comes together into a smooth dough, cover with cling film and leave to rest for 10 minutes or so.


Then, divide the dough into 3-6 pieces, depending on the size you want. At this stage I like to dust only the top of the dough. I find that dusting the top means that it won't stick to the rolling pin, but it will stick somewhat to the bench, making it easier to roll out thinly.


Heat a skillet over a medium heat. There is no need to add any oil, as there is already some oil in the dough which should prevent it from sticking to your pan. Cook on each side for about a minute. Keep a careful eye on it- there should be nice pockets of air that appear on the upper surface that will indicate it is ready to flip. Just don't burn it! Have a clean towel at the ready to keep your flatbread warm and soft.

I turned mine into a Quesadilla for lunch. Add your filling to one side of the bread and then flip the other half over the filling to inclose. Then toast it gently in either a skillet or sandwich press to warm the ingredients and melt the cheese. I added avocado, cooked quail, 4 beans mix, chilli powder and tasty cheese to mine, topping it off with some salsa after toasting.


Do have a go at making some flat bread. It is by far the quickest bread you'll ever make and, if I do say so myself, they are flaky and delicious. Much better than shop bought.


Warming Banana and Date Semolina Porridge


There is nothing more comforting than a big, warm bowl of porridge when you're feeling sniffly and sorry for yourself. This morning all I wanted was porridge- I didn't, however, feel like waiting for half an hour for oats to cook through. If you want creamy porridge in a hurry, give semolina a go. It is deliciously creamy- more like polenta than oats- and cooks in just a few short minutes.

It is very simple to make. For two serves you need 1/3 cup fine semolina, which you blend to a paste with cold water, then gradually add 1 1/2 cups of hot water and half a cup of milk. I mean gradually. If you add it too fast, you'll get lumps and nobody wants lumps in their porridge. Cook, stirring, over a gentle heat until thickened. After you've added all the liquid, throw in some chopped banana and dates, or other fruit of your choice.

Serve with maple syrup, honey, golden syrup or brown sugar, plus a sprinkling of cinnamon. My pick is either golden syrup or maple syrup. Enjoy!


Saturday 17 March 2012

Meet my precious- Kendall, The Cooking Chef


Some months ago, I bit the bullet and decided to buy something that I had had my eyes on for years. Every time I visited the small appliance department, I would go straight to this machine and stare at it longingly, but I never dreamed of actually purchasing it, because it is a very expensive piece of equiptment. A few months ago, however, there was an amazing sale in store and I managed to get the machine for 30% off. I just couldn't resist it any longer.


What is so special about this machine, you may ask? Well, it is not only a 1500 watt mixer, but it also has an induction heater, allowing you to cook in the 6.7 litre bowl up to a temperature of 140 degrees celcius. I can't tell you how amazing it is and how it has revolutionised the way that I cook. I no longer have to stand at the stove stirring custards, porridge, risottos, choux pastry etc- the machine simultaneously cooks and stirs the food for me, so I am free to roam around and prepare other things.
Here are some photos of my lovely Kenwood Cooking Chef, which I have christened Kendall. She's my new and favourite friend in the kitchen.


Raspberry and Almond Bundt Cake


There's no better way to spend your Saturday than at home with the flu, still in your Pyjamas at 2 in the afternoon. Not!

It's not all bad though. I do have the company of a freshly baked Raspberry and Almond Bundt cake. It is an adaption of Nigella Lawson's Buttermilk Birthday Cake. I just substituted 100g of the flour for 100g of freshly ground almonds, 1 1/2 teaspoons of Vanilla for 1 1/2 teaspoons of almond extract, plus I folded through about 100g each of Raspberries and finely chopped Marzipan.

I'm going through a bit of a marzipan stage at the moment- I can't get enough of the stuff. I do suggest you try adding small hunks of it to all manner of cakes, muffins and pastries. I've found that it makes a wonderful addition to cookie dough. So, instead of adding chocolate chips to your cookies, next time try some chopped up marzipan. I can't even begin to explain how wonderfully gungy the marzipan becomes when the cookies come out of the oven, not to mention the terrific caramelisation you get when that gunge comes in contact with the surface of the baking tray. Next time I make these, I'll be sure to blog about it and post some photos.

For now, here are some photos of the Raspberry and Almond Bundt cake. Two of my favourite flavours in the world- how can you go wrong with that?


Thursday 15 March 2012

It's time to get back on the ol' blog

Hello one and all (more probably none, as it has been 4 years since I last updated this blog)!

I don't know how or why, but this afternoon I was reminded of the blog that I once had. Suddenly I found myself going to blogger and requesting a new password to access that old blog. Before I knew it, I was back on air, eagerly engaged in picking layouts, backgrounds, fonts and colour schemes for a new feel to the ol' blog.

So, here I am, back from a very long absence. I make no promise that I will stay interested forever, nor that I will update regularly. I will, however, endeavour to do so. I want nothing more than create an exciting blog for all who come here: a blog that will, I hope, inspire you all to bake and create beautiful things for those you love most in the world. I also encourage you all to post comments, provide feedback and..... why not challenge me with a personal request for a particular baked good? I'm up for the challenge.

Until I begin the next round of baking, I leave with you some images of the most recent Gingerbread house or, more accurately, fortress from Christmas 2011.

Stay tuned- I'll be back with an update shortly.

Yours,

The Princess of the Kitchen